


วันจันทร์ที่ 12 สิงหาคม พ.ศ. 2556
Folder and Printer Sharing
Folder and Printer Sharing การแชร์โฟลเดอร์/เครื่องพิมพ์
by Teacher Phaitoon Yaemprasuan
occupatech@gmail.com; picta55@gmail.com
 |
| The Atmosphere of My 2003 Computer Class at 4th Floor of Building1. They were energetic and very nice schoolkids I have ever experienced. บรรยากาศห้องเรียนคอมพิวเตอร์ 2546 สมัยยังอยู่ชั้น 4 อาคาร 1 พวกเขาเป็นเด็กนักเรียนที่ขยันขันแข็ง ตั้งใจเรียน และเป็นเด็กดีมากที่สุดรุ่นหนึ่งเท่าที่ครูเคยเจอ |
ตอนนี้พวกเราล้วนแล้วแต่ใช้ Windows7 เป็นซอฟต์แวร์ระบบปฏิบัติการ (ในห้องเรียน และที่บ้านด้วย) และเครื่องของพวกเราก็เชื่อมต่อกันเป็นเวิร์กกรุ๊ปในระบบแลน ดังนั้นเราก็น่าจะใช้ความสามารถในการแชร์ทรัพยากรระหว่างกันได้ ลองดูกัน
1. FOLDER SHARING
การแชร์โฟลเดอร์
Be sure we have to specify what folder that we want to share?
ต้องระบุโฟลเดอร์ที่ต้องการแชร์
 |
| "BOOKS" is the folder of us to be shared. โฟลเดอร์ "BOOKS" คือโฟลเดอร์ที่เราอยากแชร์ |
Make a right clicking with the folder, the dialogue box appears. Select the "Sharing" tab and the "Advanced Sharing" button
คลิกขวาที่โฟลเดอร์ กรอบโต้ตอบจะปรากฏขึ้น เราก็เลือกแท็บ "Sharing" และปุ่ม
"Advanced Sharing"
 |
| Now the folder has never been shared yet (Not Shared) ตอนนี้โฟลเดอร์นี้มีสถานภาพไม่ได้ถูกแชร์ไว้ |
Properties window of the folder appears and we should select to share it with others. Now we can see the maximum number of users to simultaneously enter to the folder is 20. Then we can click on the "Permission" button.
จะปรากฏหน้าต่างพรอพเพอร์ตีส์ (คุณสมบัติ) ของโฟลเดอร์นี้ขึ้นมา และเราก็ต้องเลือกว่าจะแชร์กัน และจะเห็นว่า เพื่อนๆ จะเชื่อมต่อเข้ามาใช้โฟลเดอร์ของเราพร้อมกันได้เต็มที่ 20 เครื่อง แค่นั้น ต่อมาก็เลือกคลิกปุ่ม "Permission"
 |
| Tick the check-box, and we can change the share name or ignore it. ติ๊กเลือกว่าจะแชร์ จะเปลี่ยน/หรือไม่เปลี่ยนชื่อที่จะแชร์ก็ได้ |
After clicking on the permission button, the Permissions window shows up, you can add any user e.g. "student" and you can change the permission type of the user.
หลังจากคลิกปุ่ม permission จะมีหน้าต่างโผล่มาให้เราปรับเปลี่ยนตามความต้องการ
 |
| We can add user/ specify his permission level. เราสามารถเพิ่มยูสเซอร์ / ระบุระดับการอนุญาตใช้งานโฟลเดอร์ของเราแก่เขา |
Finally click on the "Apply" button, the folder now has been shared.
เมื่อเราคลิกปุ่ม "Apply" โฟลเดอร์ของเราก็ได้รับการแบ่งปันให้ใช้ร่วมกันได้ในเครือข่ายแล้ว
 |
| Well, our folder has been shared. Folder ของเราได้รับการแชร์กันใช้เรียบร้อยแล้ว |
Sample Special
ตัวอย่าง
This is from my computer (Its hostname is "ALPHA00".), when I click on the "Network" (at the left pane of Windows7 " computer explorer" ), some computer hostnames appears. Yes, I want to randomly select any hostname. If the target of mine is "KACHATUCH", well, I would make a double-click on it.
นี่เป็นคอมพิวเตอร์ของครูที่ห้องพักครู (โฮสต์เนมว่า ALPHA00) เมื่อครูคลิกเลือก Network (อยู่ตรงแถบซ้ายของหน้าต่าง Computer explorer ของ Windows7 ก็จะปรากฏโฮสต์เนมต่างๆ ในเครือข่าย แน่นอนว่า ครูก็คงต้องสุ่มเลือกเข้าไปใช้เครื่องใดสักเครื่อง ที่ครูเล็งไว้ก็คือเครื่องที่มีโฮสต์เนมว่า Kachatuch
 |
| My Target Hostname is "KACHATUCH" เครื่องที่ครูเล็งไว้คือ โฮสต์เนมที่ชื่อว่า Kachatuch |
The shared folders of the hostname will be appeared. Then we can do a random selection and we can find any other subfolders that we can select to use.
ตอนนี้ก็จะเห็นโฟลเดอร์ที่โฮสต์เนม Kachatuch เราก็คงต้องสุ่มเลือกโฟลเดอร์ แล้วเราก็จะเห็นโฟลเดอร์ย่อยๆ ที่เราสามารถจะเลือกเข้าไปใช้ได้
 |
| The Shared Folders of "Kachatuch" appears, any folder could be selected. If any shared folder had been selected its subfolders would be revealed. แชร์โฟลเดอร์ของโฮสต์เนม "Kachatuch" ก็จะปรากฏขึ้นมาให้เห็น เราสามารถเลือกโฟลเดอร์ไดก็ได้ ถ้าแชร์โฟลเดอร์ใดถูกเลือกเข้าใช้ โฟลเดอร์ย่อยๆ ก็จะได้รับการเปิดตัวออกมาให้เห็นฝเลือกใช้ได้ |
2. PRINTER SHARING
การแชร์พรินเตอร์
Click the "Start button" of Windows7 desktop, the pop-up menu appears, then select "Devices and Printers", the target printer of us will be appeared.
จากปุ่ม Start ของ Windows7 เราก็เลือก "Devices and Printers" ก็จะเจอพรินเตอร์ที่เราอยากจะแชร์กันใช้
 |
| Select the printer |
Make a right click on the printer icon, the select menu will show up, then select "Printers properties" option. Then we can operate sharing easily.
คลิกขวาที่รูปพรินเตอร์ จะมีป็อปอัพเมนูโผล่ขึ้นมา ให้เราเลือก "Printers properties" ต่อจากนี้ เราก็คงจะปฏิบัติการแชร์พรินเตอร์ได้ไม่ยากแล้ว...
 |
| Select : Printer Properties |
Click on the "Sharing tab", and we can rename the sharing printer.
เลือกแท็บ Sharing และสามารถเปลี่ยนชื่อพรินเตอร์ที่กำลังจะแชร์ได้ด้วย
 |
| Select the Sharing Tab |
 |
| Select to share |
วันอาทิตย์ที่ 11 สิงหาคม พ.ศ. 2556
Internet Connection Problems
Internet Connection Problems ปัญหาการเชื่อมต่ออินเทอร์เน็ต
by Teacher Phaitoon Yaemprasuan : occupatech@gmail.com
http://picta55.blogspot.com
 |
| Sometimes the problems caused by unintentional human errors บางทีนะ ปัญหาก็เกิดจากความผิดพลาดที่ไม่เจตนาของคนเราเองนี่แหละ |
Sometimes Internet connection problem can be our frustration. Rather than pressing F5-key and trying to reload the website when we experience a problem, here are some ways we can troubleshoot the problem and identify the cause.
บางครั้งปัญหาการเชื่อมต่ออินเทอร์เน็ตอาจกลายเป็นเรื่องความคับข้องใจเราได้เหมือนกัน การกดแป้น F5 และการโหลดเว็บไซต์ใหม่ ก็อาจจะไม่เพียงพอ แต่ถ้าเราพอจะมีประสบการณ์ในการแก้ปัญหาอยู่บ้าง ปัญหานี้ก็อาจจะคลี่คลายลงได้
Ensure we check the physical connections before getting too involved with troubleshooting. Anyone could have accidentally kicked the router or modem’s power cable or pulled an Ethernet cable out of a socket, causing the problem.
ก่อนอื่น เราต้องแน่ใจก่อนนะว่า กายภาพของการเชื่อมต่อ (the physical connections) ได้แก่ อุปกรณ์ สายสัญญาณ จุดเชื่อมต่อต่างๆ จักต้องอยู่ในสภาพปกติ ไม่มีใครไปสะดุดสายจนหลุด หรือดึงสายต่างๆ ออก
# # #
Ping
Ping (wikipedia.org) is a computer network administration utility used to test the reach-ability of a host on an Internet Protocol (IP) network and to measure the round-trip time for messages sent from the originating host to a destination computer.
ping เป็นคำสั่งที่ใช้บริหารจัดการ (administration utility) ระบบเครือข่ายคอมพิวเตอร์ ใช้เพื่อตรวจสอบการเข้าถึงเครื่องคอมพิวเตอร์ที่มีตัวตนจริงหรือโฮสต์ (host) ของเครือข่ายที่ใช้อินเทอร์เน็ตโปรโตคอล เพื่อจะวัดเวลาของการสื่อสารไป-กลับ ระหว่างคอมพิวเตอร์ต้นทางและปลายทาง
The name comes from active sonar terminology which sends a pulse of sound and listens for the echo to detect objects underwater.
ชื่อนี้มีที่มาจากโซนาร์ sonar terminology ที่เรือดำน้ำใช้ส่งให้ไปกระทบวัตถุใต้น้ำ แล้วสะท้อนกลับมานั่นเอง
One of the first things to try when our connection doesn’t seem to be working properly is the ping command. Open a Command Prompt window from your "Start button" using the "cmd" command and type a command like ping google.com .
สิ่งแรกที่เราควรทำ เมื่อการเชื่อมต่ออินเทอร์เน็ตของเราไม่เวิร์ก ก็คือ การใช้คำสั่ง ping โดยอาจจะเปิดหน้าต่าง command prompt ด้วยคำสั่ง cmd ณ Start Button แล้วพิมพ์คำสั่ง เช่น ping google.com .
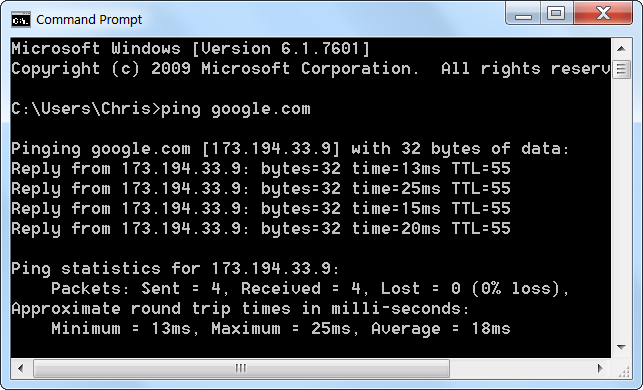 |
This command sends several packets to the address you specify.
|
# # #
Modem & Router Issues
Sometimes our modems or routers can cause the problem of Internet connection. A modem is a device that communicates with your Internet service provider (ISP), e.g. TOT, while the router shares the connection among all the computers and other networked devices in our home network. In my case (and also other students' cases ) , the modem and the router of mine is the same device, so it is called the "modem-router".บางครั้ง Modem หรือ Router ก็อาจจะเป็นปัญหาการเชื่อมต่ออินเทอร์เน็ตของเราก็ได้
Modem เป็นเครื่องมือในการสื่อสารกับผู้ให้บริการอินเทอร์เน็ต (Internet service provider : ISP) อาทิ TOT สำหรับ Router เป็นอุปกรณ์ที่ทำหน้าที่แชร์การเชื่อมต่อระหว่างคอมพิวเตอร์และอุปกรณ์ต่างๆ ในระบบโฮมเน็ตเวิร์ก กรณีของบ้านครูเอง (และบ้านนักเรียนกาญจนาฯ หลายคน) อุปกรณ์สองอย่างนี้จะเป็นตัวเดียวกัน มันเลยถูกเรียกว่า "modem-router"
Let's take a look at the modem-router. If green lights are flashing on it, that’s normal and indicates network traffic. If we see a steady, blinking orange light, that generally indicates the problem.
ลองดูสิว่า modem-router ของบ้านเรา มันมีไฟสัญญาณเป็นสีเขียวนิ่งๆ หรือเปล่า? ถ้าใช่ ก็แสดงว่า เครือข่ายโฮมเน็ตเวิร์กบ้านเราทำงานเป็นปกติดีไม่มีปัญหา แต่ถ้าเราเห็นไฟสัญญาณเป็นสีอำพันกระพริบๆ ก็หมายความว่า โฮมเน็ตเวิร์กมีปัญหาแล้ว
 |
| All Green Lights Mean Normality สัญญาณไฟเขียวตลอดแบบนี้ แสดงว่า ทุกอย่างปกติดี |
If the lights indicate that either devices are experiencing a problem, try unplugging them and plugging them back in. This is just like restarting our computer. If we still experience problems, we may need to perform a factory reset on your router (to see its manual).
หากไฟสัญญาณของ modem-router แสดงว่า มีปัญหา ขอให้เราลองดึงปลั๊กไฟของมันออก แล้วเสียบกลับเข้าไปใหม่ ทำแบบนี้ก็ทำนองเดียวกับการที่เรา Restart คอมพิวเตอร์ใหม่นั่นแหละ หากทำแล้วยังมีปัญหาอยู่ เราก็อาจจะต้องทำการรีเซ็ตอุปกรณ์นี้ใหม่ (ดูคู่มือก่อน) ให้กลับไปเป็นค่าที่ตั้งมาจากโรงงาน
# # #
Our Classroom102
What is about the problem when we are in the classroom? Because the IPaddress conflict can be occurred anytime, so any computer in the classroom102 can be kicked off easily by the gateway computer of the Media Center which we have to lean on.ปัญหาการเชื่อมต่ออินเทอร์เน็ตในห้องเรียนเป็นแบบไหน? ก็เพราะปัญหารหัสไอพีของเครื่องขัดแย้งกัน (IPaddress conflict) สามารถเกิดขึ้นได้ตลอดเวลา ดังนั้นคอมพิวเตอร์ในห้องเรียน102 ก็มีสิทธิ์จะถูกดีดออกนอกระบบได้ไม่ยากจากเครื่องเกตเวย์ของศูนย์สื่อที่เราต้องพึ่งพาในการเชื่อมต่ออินเทอร์เน็ตนั่นเอง
Yes, we cannot connect to the Net directly but always request Internet sharing with the server computer of School Media Center through the local area network.
ใช่เลย เราไม่ และไม่อาจเชื่อมต่ออินเทอร์เน็ตโดยตรงได้ นอกจากต้องพึ่งพาเครื่องคอมพิวเตอร์แม่ข่ายของศูนย์สื่อของโรงเรียน (the server computer of School Media Center) ผ่านระบบเครือข่ายแลน
 |
| There are variety kinds of computer in the classroom102, both old and new, big-name and no-name, useable and unusable คอมพิวเตอร์ในห้องเรียน 102 มีหลายจำพวก ทั้งเก่าทั้งใหม่ ทั้งมียี่ห้อและไม่มียี่ห้อ ที่ใช้ได้ก็มี ที่ใช้ไม่ได้ก็มี |
Because any student can log on any computer in our classroom with the administrative account, so he has the full permissions to change/config anything about the network, then any problem can be occurred anytime.
เป็นเพราะนักเรียนสามารถจะล็อกออนเข้าใช้งานคอมพิวเตอร์ด้วยแอ็คเคาท์ของผู้ดูและระบบของเครื่องคอมพิวเตอร์นั้นๆ (the administrative account) ก็เลยมีสิทธิ์เต็มร้อยที่จะเข้าไปปรับค่าต่างๆ ของระบบเครือข่ายของเครื่อง ปัญหาก็อาจจะเกิดขึ้นได้ตลอดเวลา
ไม่มีความคิดเห็น:
แสดงความคิดเห็น